I am convinced that making your own beauty products is the only way to really control what substances you are using on your body. But as many of you I guess, I do not have time to make my own beauty products at home and prefer buying some from the shops… or so I thought. I have recently discovered that making your own wonderful lip balm is really easy!
For me, a great lip balm shall not only be nourishing but also long lasting + smell and taste good. So that’s what I tried to combine in this particular balm and it worked! It smells delicious, lasts long and makes my lips so soft.
So let’s start!
Supplies needed:
- 3/4 table spoon beeswax beads => this is what will give your balm its consistency, you can put more for a harder balm and less to keep it more oily.
- 1 table spoon shea butter
- 1 table spoon coconut oil
- 1/2 table spoon sweet almond oil (optional)
- 1/2 table spoon vanilla flavouring or any flavour you like or not at all if you prefer keeping the natural flavour
- 1 drop of tea tree essential oil (optional but nice for its antibacterial virtues – don’t put too much as it has a strong smell)
- 6 drops of Ylang Ylang essential oil or any fragrance you like (lavender, geranium…)
As you can see many ingredients are optional and the list goes down to only 4!
I love using natural oils for body hydration, so I have some at home and brought coconut oil back from my trips to Thailand. But I did not have beeswax beads so I ordered from iHerbs, an online shop for organic products which ships free to Hong Kong. You even get a 10% discount on your first time order.

You will also need some basic tools/containers:
- A table spoon
- A glass or ceramic bowl
- Some small lip balm pots
- A tea candle or burner
And for the final touch:
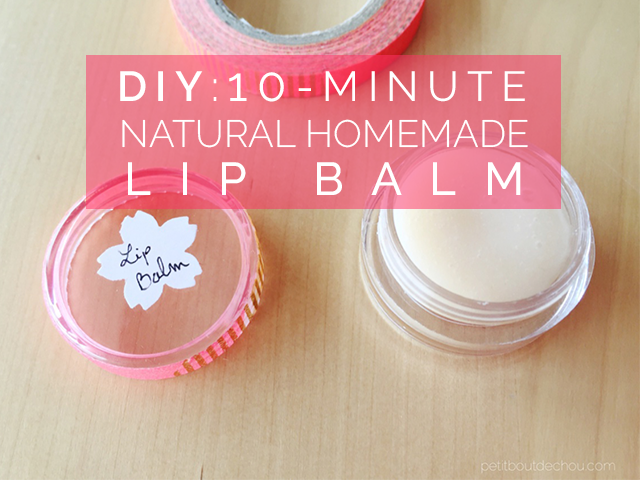
- A punch hole with the shape of your choice – I choose a little sakura flower shape
- Some thin masking tape
- Blank stickers of your choice
DIY steps:
Step 1
Put your beeswax, shea butter, coconut and sweet almond oil, vanilla flavouring and essential oils into the bowl on your lit candle.

Step 2
Stir slowly with the spoon until all ingredients have melted and you get a clear mixture.

Watch closely so it doesn’t burn (it should gently melt but not boil) and be careful as the bowl will be hot.

Step 3
Transfer the mixture to your lip balm pots. Depending on your bowl’s shape you may need to use a jug or a funnel for this. You should have enough for 2 to 3 small pots.
And you are almost done.
Step 4 (optional)
Put some washi tape around the lid of your lip balm pot.

Use your punch hole on the sticker sheet to make your own customized sticker tag. I wrote “lip balm” but you can also put the name of the person you want to offer it as a gift.

I hope you enjoyed this beauty tutorial.
If you did, follow me on Pinterest, Instagram or Facebook for more craft supplies tips, DIYs and free printables!
You can also subscribe to Petit Bout de News my monthly newsletter.


2 Comments
thanks for share! I need to try this, currently I’m using nivea lip butter 🙂
Nivea lip butter looks nice but contains unfortunately many chemicals… One of the main ingredients is crystalline wax: a type of wax produced by de-oiling petrolatum, as part of the petroleum refining process. No very attracting in the end. Thanks for your comments, it gives me an idea for a future post!