
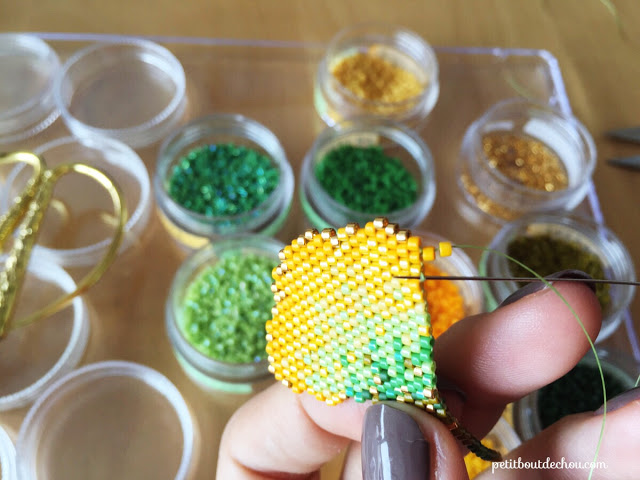
Autumn is here and leaves are now displaying their beautiful colours. The ginko tree has amazingly shaped leaves that I could not resist turning into a beadwork. This necklace is made with Miyuki delica beads using the brick stitch technique that I will describe for you below.
This post was first published on perlesandco.com. You can find the French version here.

SUPPLIES NEEDED
- Beading thread in light green colour
- 2 fine beading needles
- Miyuki delica beads 11/0
- DB 0163 opaque green AB
- DB 0169 opaque chartreuse AB
- DB 0724 opaque green
- DB0797 dyed semi mat opaque jade green
- DB 1133 opaque mandarin
- DB 1572 opaque canary AB
- DB 2102 duracoat opaque banana
- DB 2103 duracoat opaque light squash
- DB 2141 duracoat opaque spanish olive
- DB 0031 gold plated 24k
- 2.5mm diameter jump rings gold plated x4
- jewellery pliers
- gold plated chain 0.5m
- 1 end chain gold plated
- 1 lobster clasp gold plated
- scissors

DIY STEPS
1. Start the first row with a ladder stitch
Cut about 2 m of beading thread. Then, thread each end in one needle.
Please find below the grids of the ginko leaf I have prepared.

For the first row, following the grid, string on the first bead using one needle and go through it using the second needle (1) and pull it up (2).
Repeat these steps for the second bead on your pattern(3).
Repeat until you have done all the beads of your first row (4).

2. Second row
The second row start with a simple increase (1 more bead on the row).
To do so, string on the first two beads of the row following the grid (1) and slide your needle between the first and the second bead of the previous row.
Then, go through the second bead from bottom to top (2).
Pull the thread (3). Your increase is done.

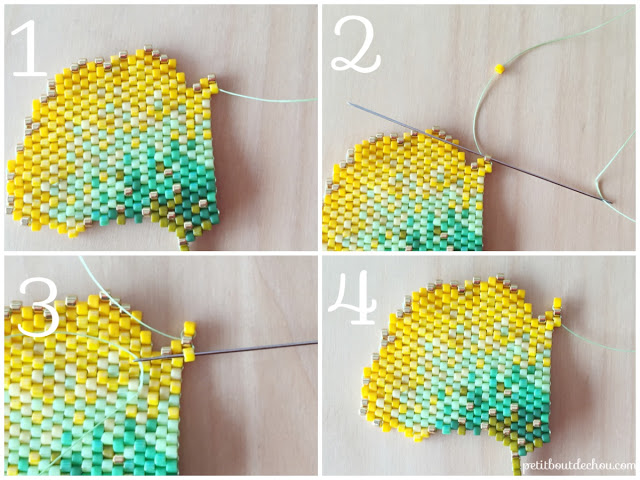
3. Simple decrease at the beginning of the row
You will have to do some simple decrease at the beginning of the row along the grid. So here is how to do:
Start by stringing on the two first beads of this row following the pattern. Then, slide the needle between the second and third beads of the previous row (1).
Pull the string fully and go through the second bead of the new row (2).
Pull the string.
Go through the first bead of the row from top to bottom. Pull the string (3).
Go through the second bead again from bottom to top. Pull the string (4).
The first two beads should now be well positioned. You have done a decrease at the beginning of the row.
Continue following the pattern using normal stitches until the end of the row (5).
For the normal stitch, just string on a new bead and slide your needle between the two beads of the previous row located just below.
Go through this bead and pull the string.

4. Simple increase at the end of the row
You will also have to make increases at the end of the row.
To do so string on one bead and go through the beads below on the two previous rows (1). Then, come back up by going through the bead next to it and the two previous ones (2). You have formed an “X” and you are back through your additional bead.

Follow the pattern until you reach the end of the left half.

5. Start the second half
The second half starts with a double decrease. It is the same as a simple decrease at the beginning of the row except that you need to weave through the beadwork so that your thread is going out of the second bead of the previous row instead of the first one.
6. Multiple increase at the beginning of the row
You will encounter a double increase in the second half. It is done by starting with a simple increase (1). Go through the first bead.
String on the additional bead and go through the first bead(2).
Then, go through the second bead (3).
Your multiple increase is done (4).
Follow the grid until the end of the second half.
Hide your thread by weaving through the beadwork.
7. Mount your beadwork on a chain to form the necklace
Use your pliers to open a jump ring and insert it in one of the top beads of your leaf.
Insert the last ring of the chain cut in half in the ring too before closing it. Then, open a jump ring to link the chain and the end chain, close the ring.
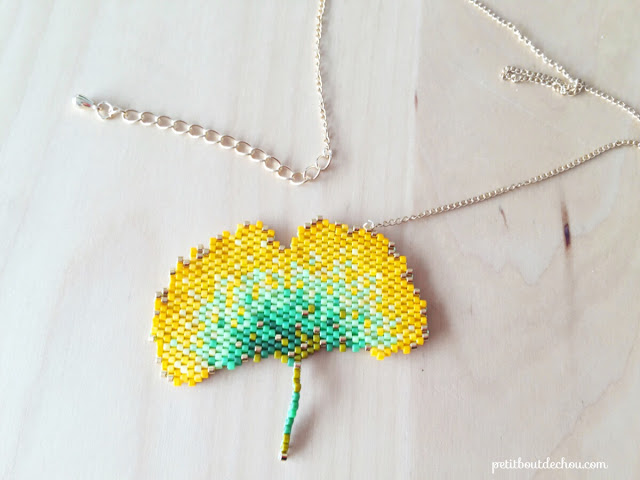
For the other side, repeat the operation to link the chain to the beadwork. Then, open a jump ring to link the chain and the clasp. Your necklace is done.

Follow me on Pinterest, Instagram or Facebook for more craft supplies tips, DIYs and free printables!
You might also like:

You can subscribe to Petit Bout de News my monthly newsletter to make sure you do not miss any post 😉


