
I have been thinking about this post for a while. As you may have noticed already I LOVE Japanese papers! They are so pretty and original that I think they are perfect to accompany special occasion cards such as wedding invitation, save the date, birth announcement, thank you cards and so many other occasions!
These are really easy to do yet add a great touch of customisation and chic to your special message.
You can also chose different patterns (from an origami paper package for example) if you have a lot of those to send and would like everybody to receive a special sending.
Supplies needed:
- Coloured envelope (matching your card colours of course!) – I bought these in CN square at Yau Ma Tei.
- Japanese Yuzen Paper – I used big sheets (48cm x 64cm) 80g Washi Chiyogami paper from Adeline Klam online store but you can find origami paper in many stores in Hong Kong as described in my post about the 10 shopping places every craft lover in Hong Kong should know. I love these Chiyogami papers as they have gold or silver contouring which gives that chic touch.
- a ruler
- a pencil
- scissors
- glue
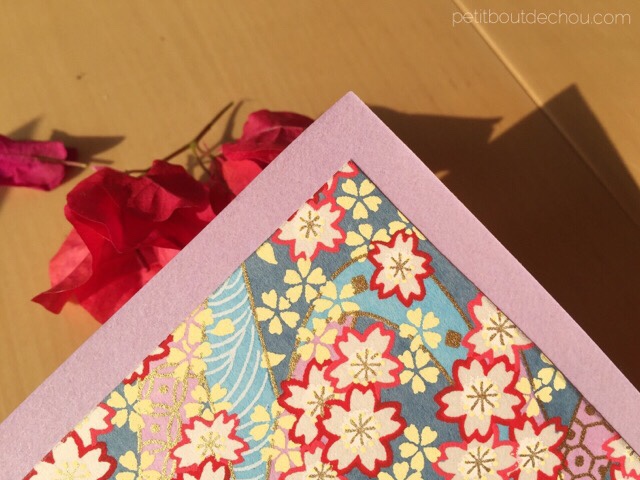
A word on Chiyogami: this is a kind of washi paper (Japanese paper) that has been hand stenciled or printed with traditional Japanese imagery using bright colours and patterns. These designs were originally used on kimono textiles from the Edo period (1603-1868).
I love these Chiyogami papers as they often have gold or silver contouring which gives that touch of elegance to any craft project, so beautiful!
 |
| Chiyogami paper from Adeline Klam |
DIY steps
1. Take the following measures from your envelope to determine the shape of you Japanese paper:
- Width – 2 times 2mm (2mm less on each side)
- Height from the folding line -2mm
- Triangle dimensions with a 1cm offset as shown on the last picture below, to keep the sticky part free.

2. Prepare your shape following these dimensions and cutting the two lower corners.
3. Insert the Japanese paper inside the envelope and glue the triangle part only. No need to glue the bottom part, it will stay in place inside the envelope.
And that’s all there is to it! Pretty easy right?
I hope you found this DIY useful. I would love seeing your creations. Let me know in the comments below if you know other great places in Hong Kong selling this king of paper.
Happy crafting everyone!


