I have been surrounded for the last year by my friends’ cute babies. So I was looking for an idea of simple gifts for them. I had not been using my sewing machine for a while so I thought I would start with something easy like a bib.
Supplies needed
- This free bib pattern
- A minimum 20x20cm sponge towel
- Two 25×25 cm minimum fabric squares
- Fabric marker pen
- Scissors
- Pins
- Ruler
- Interface double sided adhesive cloth
- Sewing machine
- Iron
DIY steps
I. Cutting works
I have used for this bib a beautiful cotton Korean fabric with colourful triangles pattern.
Print the free pattern on a rather thick piece of paper: cut following the lines and place the pattern on the fabric using a few pins.
Use a fabric marker pen following the contour of the pattern.
Repeat the same operation on the sponge towel.
Cut both pieces.
II. Prepare your own binding
Use your second piece of fabric.
1. Fold it over in two following the diagonal and cut along the folding line.
2. Place the newly obtained triangles right side against right side as per picture 2 and sew the common edge.
3. You obtain this parallelogram.
4. Divide the width in 4 to 5 cm wide strips by marking them using a ruler.
Then sew the edges together with an offset in the strips. This allows to create one continuous strip.
More details on this step here (step 5).
5. Cut the strip.
6. Fold it in two and iron it on the full length
Fold again in two to form the binding and iron. Your own fabric binding is done!
III. Sew the appliqués
Cut triangles of fabric following the pattern.
Cut the same shapes in the interface cloth. Pin the interface cloth and the piece of fabric on top. Repeat for the 3 other triangles.
Set your sewing machine on zigzag stitch, width 3, length 0.5 – the stitches have to be very close.
You can find full explanations on this stitch here.
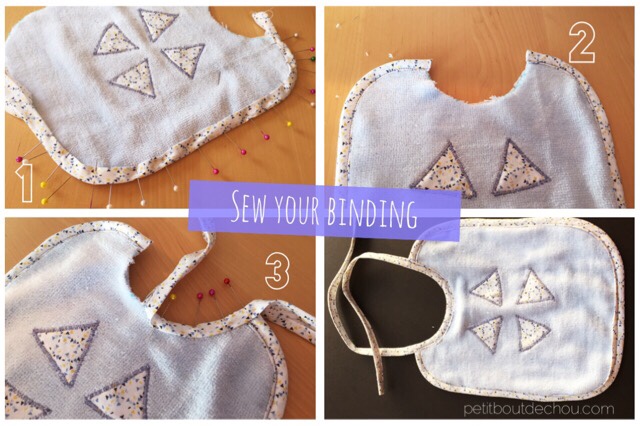
IV. Sew your binding
Place the sponge towel piece back against the fabric piece’s back.
Take your time to pin carefully the binding all around the edges of the bib (except around the collar- see image 2 below). Make sure the binding is equally placed on both sides of the bib.
Sew the binding around at 0.7mm from the edge.
Then, pin the binding on the collar making sure you center the binding from the middle of the collar.
To sew, start from the one end of the binding strip to the other.
I hope you have enjoyed doing this DIY.
Please do not hesitate to leave me a comment below or to share your creations.
Happy crafting everyone!
Update: 04th of July 2015
Thank you so much J. & L. for this picture of your beautiful baby girl wearing one of my bib.
She is so cute!
This bib is slightly different from the one described in this post as there is an additional strap that goes around the baby’s neck and a piece of velcro to fasten it on the side. Apart from that, the technics used are the same.





2 Comments
What a delightful DIY project! Making bibs for your friends’ cute babies sounds like a thoughtful and practical gift idea, and your step-by-step instructions make it seem so accessible for anyone with basic sewing skills.
I appreciate how you’ve provided a list of supplies needed and clear instructions for each step of the process, making it easy for beginners to follow along. Using a beautiful cotton Korean fabric with a colorful triangles pattern adds a personal and stylish touch to the bibs, ensuring they’re both functional and fashionable.
The inclusion of a free bib pattern and the suggestion to print it on thick paper for durability is a thoughtful detail, ensuring that anyone can access the pattern easily. Your attention to detail, from cutting the fabric to marking and sewing, reflects your dedication to creating high-quality and professional-looking bibs.
Thanks a lot for your nice comment. Making DIY bibs using great coton fabric was fun and I was happy to share this experience and my pattern with you all.